Deploy and Debug Applications
Overview
This section provides a simple example of how to test and deploy OSGi bundles and deployment packages in a Kura environment. These instructions use the “Hello World” OSGi project created in the previous section. In this example, you will learn how to perform the following functions:
-
Use local OSGi emulation mode in Eclipse
-
Deploy a bundle to a remote target running the OSGi Framework
-
Install a Deployment Package to a remote target running the OSGi Framework
-
Manage OSGi bundles on a target device
-
Set bundle Logger levels in Kura
Prerequisites
Testing the OSGi Plug-in
Once you have created an OSGi plug-in, you can test it in Local Emulation Mode and/or deploy it to a Remote Target Device.
Local Emulation Mode
The Kura user workspace can be used in Eclipse in local emulation mode (Linux/OS X only; this feature is not currently supported under Windows). To deploy the code to a running system, see the section Remote Target Device.
Run Kura in Emulator Mode
In the Eclipse workspace, locate the org.eclipse.kura.emulator project. Expand it to show the src/main/resources folder.
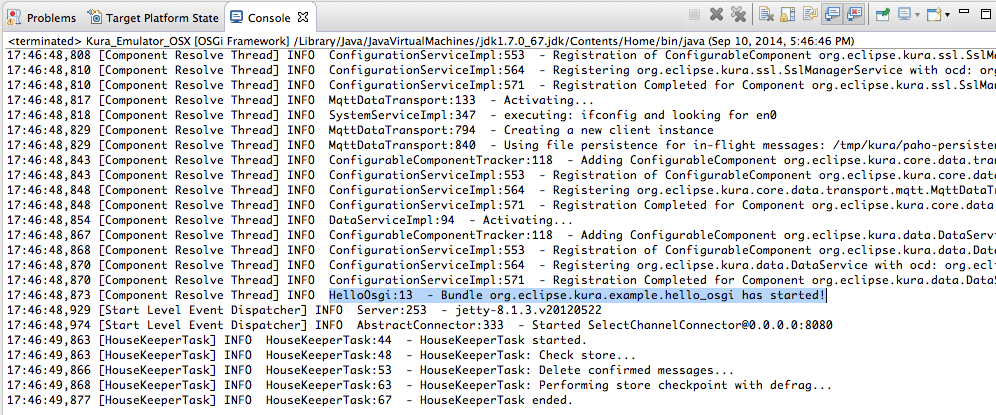
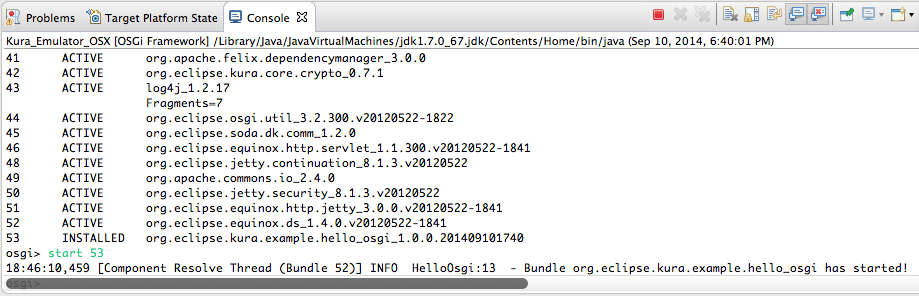
Right-click the Kura_Emulator.launch file. In the context menu, select the Run as option, and select the Kura_Emulator*. This will start Kura running locally and will display a Console window in the bottom pane in Eclipse. The Console window will show the OSGi diagnostics as various bundles start and execute.
Because the org.eclipse.kura.example.hello_osgi bundle is in the workspace with a valid activate() method, it is automatically started with the Kura OSGi framework. Note the INFO message highlighted below that shows the bundle’s activate() method was run.
List OSGi Bundles in Local Mode
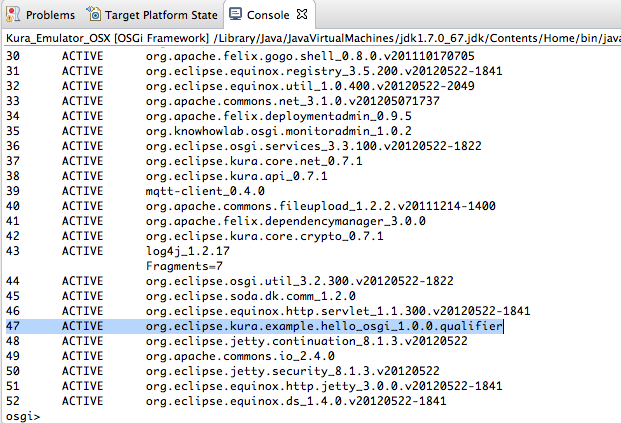
With the OSGi framework running in the Eclipse console (refer to the previous section), click in the Console window. Press Enter/Return and then type the ‘ss’ command to show a list of installed bundles. Note the bundle ID number for the org.eclipse.kura.example.hello_osgi bundle.
Start/Stop Bundle in Local Mode
In the OSGi Console window in Eclipse, run the
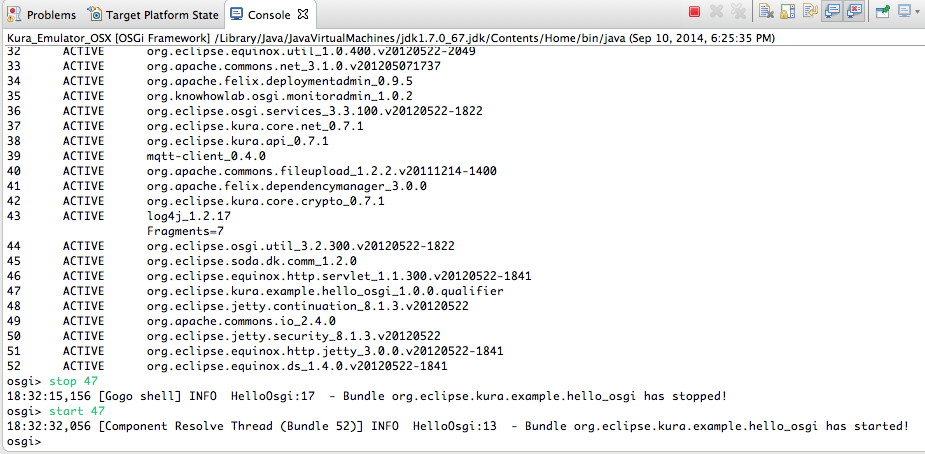
start ## or stop ##
commands to start or stop a bundle, where the “##” is either the bundle ID number or the bundle name (such as “start org.eclipse.kura.example.hello_osgi”). Note that the INFO messages for both the activate() and deactivate() messages appear in the Console window when the bundle is started or stopped.
Install/Uninstall Bundle in Local Mode
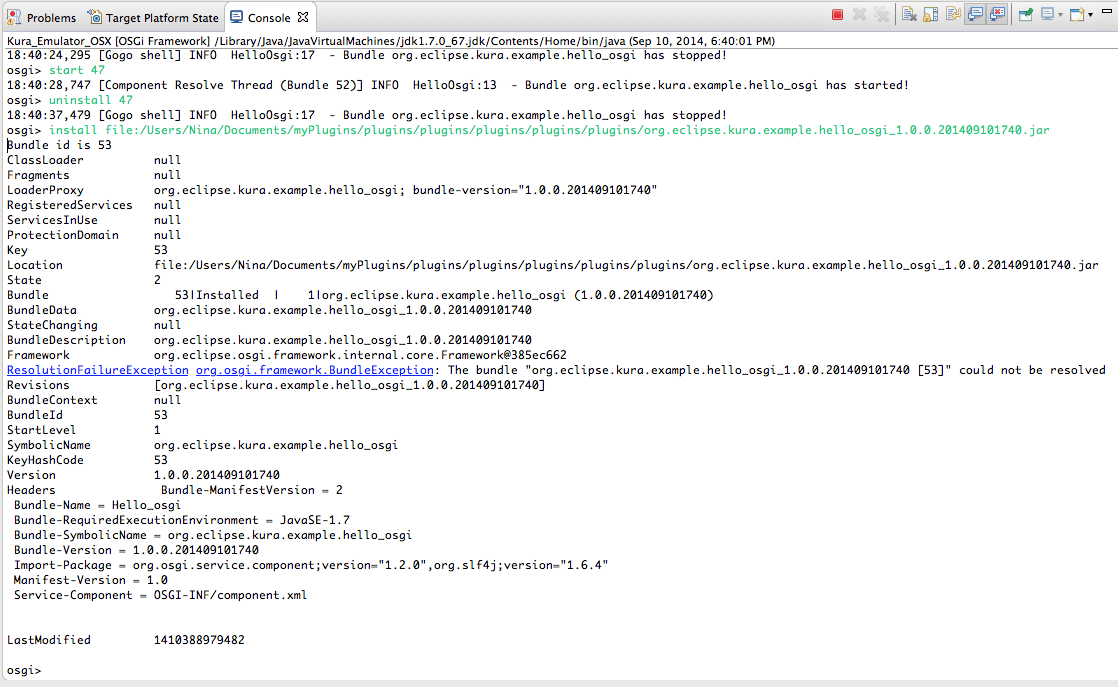
In the OSGi Console window in Eclipse, bundles can be installed or uninstalled. To uninstall the example bundle, issue the command ‘uninstall ##’, where “##” is either the bundle ID number or the bundle name, such as:
uninstall 47 or uninstall org.eclipse.kura.example.hello_osgi
A message will appear indicating that the bundle has been stopped.
Once the bundle has been uninstalled from the local OSGi console, it cannot be started or installed by number or name. Instead, it must be installed by using the plug-in JAR file created earlier. Issue the ‘install’ command to install a bundle into the Emulation environment:
install file:/[*path_to_bundle*]/[*bundle_name*].jar
where “[path_to_bundle]/[bundle_name].jar” should be replaced with the name of the bundle exported earlier (the section Hello World Using the Kura Logger), as shown in the example below:
install file:/Users/Nina/Documents/myPlugins/plugins/plugins/plugins/plugins/plugins/org.eclipse.kura.example.hello_osgi_ 1.0.0.201409101740.jar
Then the bundle can be started or stopped, as described in the previous section, Start/Stop Bundle in Local Mode. Optionally, you can add the flag ‘-start’ to the ‘install’ command to automatically start the bundle after installation.
Remote Target Device
One or more OSGi bundles can be deployed to a remote device running Kura, either by installing separate bundle files or deployment packages using Eclipse.
Warning
These steps require Kura to be running on the target device.
This method of deployment is temporary on the remote target device and is not persistent after a restart. To make the deployment permanent, see Making Deployment Permanent.
Connect to Remote OSGi Framework
To deploy a bundle to the remote target device, you will need to connect Eclipse to the OSGi framework running on the device. This is done using mToolkit. See Kura Setup for instructions on installing mToolkit into the Eclipse development environment.
-
Select the Eclipse menu Window | Show View | Other.
-
Select mToolkit -> Frameworks entry to open the mToolkit Frameworks view.
-
Enter a name for the framework definition and the IP address of the target device.
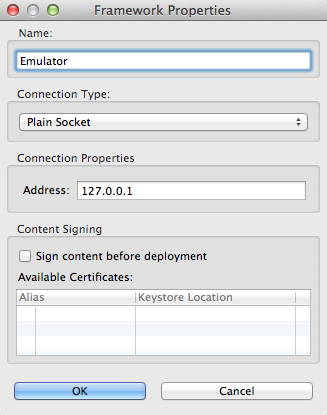
Close the dialog by clicking the OK button.
Warning
The remote target device must have port 1450 open in its firewall, in order to allow mToolkit o make a connection to its OSGi framework. If this port is not opened, refer to the section Open Port for OSGi Remote Connection.
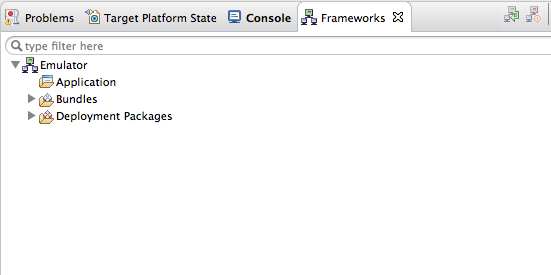
Right-click the framework icon name and select Connect Framework. The list of installed bundles and deployment packages should be retrieved shortly. (Use the Disconnect Framework option to disconnect from the remote target framework when finished.)
Open Port for OSGi Remote Connection
In order to allow mToolkit to make a remote connection to the OSGi framework on the target device, the device must allow the incoming port in its firewall. To set this option, open a Web browser and log into Kura using its current IP address, such as:
http://10.11.5.4
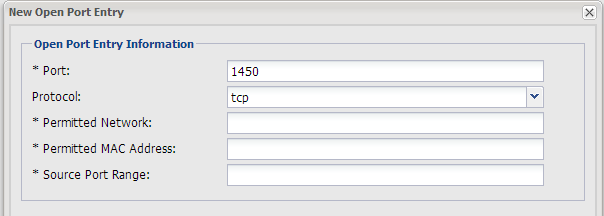
Click the Firewall icon and then click the Open Ports tab. If port 1450 is not shown in the list of allowed ports, click the New button under Open Ports. Enter the port 1450 and select protocol TCP. Then click Submit.
Now, click Apply to apply changes to the remote device.
Install Single Bundle to Target Device
With the Eclipse environment connected to the remote OSGi target framework, a single bundle can be installed on the remote device.
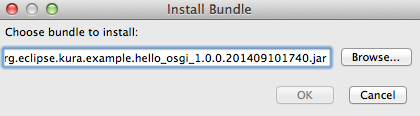
In the mToolkit Frameworks view, right-click the Framework name and select Install Bundle. (This requires that you have exported the bundle as a deployable plug-in JAR file. See the section Hello World Using the Kura Logger.)
Use the Browse button to select the JAR file and click OK to install it to the target device.
The newly installed bundle should be shown in the Frameworks view under Bundles.
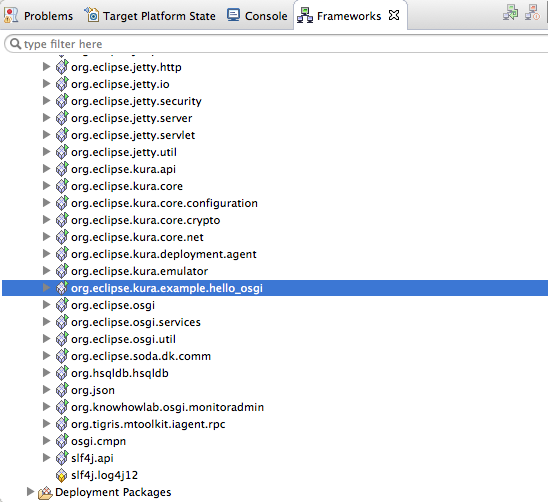
To control operation of the bundle through the OSGi Frameworks view, right-click the bundle name. The following actions can be performed:
-
Start – start the bundle
-
Stop – stop the bundle
-
Update – reinstall the bundle
-
Install Bundle – install a different bundle
-
Uninstall Bundle – remove this bundle from the target device
-
Show Bundle IDs / Show Bundle Versions – show additional information about bundles
You can also verify operation of the bundle on the target device itself. See the section Manage Bundles on Target Device.
Install Deployment Package to Target Device
With the Eclipse environment connected to the remote OSGi target framework, a deployment package can be installed on the remote device.
NOTE: If you have just installed the individual bundle in the previous section, you should uninstall it before proceeding. Doing so will avoid any confusion in having the same bundle installed twice.
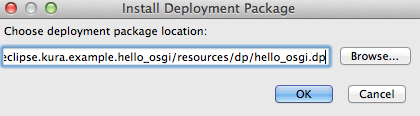
In the mToolkit Frameworks view, right-click the Framework name and select Install Deployment Package. (This step requires that you have exported the bundle as a deployable plug-in JAR file. See the section Hello World Using the Kura Logger for instructions on exporting the OSGi bundle.)
Open the resources/dp folder in the Workspace filesystem directory, select the .dp file (not the “.dpp” file), and click OK.
The deployment package will be installed on the target device and shown in the Frameworks view under Deployment Packages. (The deployment package can also be uninstalled from the Framework view.)

The bundle included in the deployment package can also be viewed under Bundles and can be controlled remotely (start/stop) as with other bundles. The operation of the bundle can also be verified on the target device itself. See the section Manage Bundles on Target Device.
Connect to OSGi on Target Device
You can manage the OSGi framework on a target device by logging into a console on the device using a connected keyboard and VGA monitor or over a network connection using SSH (PuTTY in Windows or ‘ssh’ from Linux or Mac).
At the command prompt, display the Kura log file with:
tail -f /var/log/kura.log
Connect to the OSGi framework by typing the following commands:
telnet localhost 5002
There are many commands available in the OSGi console for managing bundles. Following are just a few useful commands:
| Command | Description |
|---|---|
| ss | Lists names and ID of bundles |
| help | Displays the help menu of OSGi commands |
| lb | Lists all installed bundles and IDs |
| h [bundle IDs] | Displays bundle headers (i.e., Bundle Manifest Version, Name, Required Execution Environment, Symbolic Name, Version, Import Package, Manifest Version, and Service Component) |
| exit | Exits the OSGi console and stops Kura |
| disconnect | Exits the OSGi console, but leaves Kura running |
Manage Bundles on Target Device
From the OSGi command line, you can display a list of bundles with the ‘ss’ command as shown in the example below:
ss
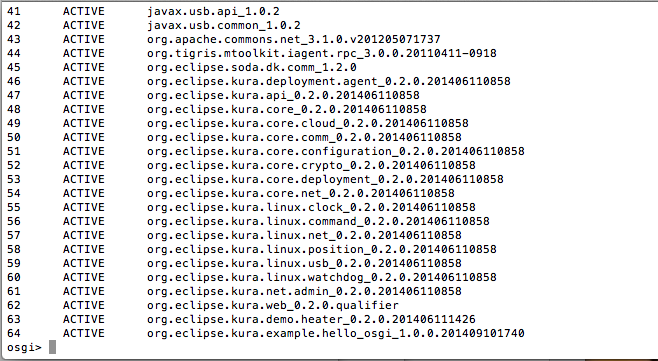
In this example, the org.eclipse.kura.example.hello_osgi bundle ID is 64.
You can run the ‘start ##’ or ‘stop ##’ commands to start or stop a bundle, where the “##” is either the bundle ID number or the bundle name (such as “start org.eclipse.kura.example.hello_osgi”). To verify that the bundled is stopped, you can issue the ‘ss’ command. If the bundled is stopped, the activity will show RESOLVED (as shown below). If the bundle is started, the activity will show ACTIVE (as shown above).

Set Kura Logger Levels
Kura logger levels are defined in a configuration file. The messages that appear require a log statement in the application and that the log level of the statement matches the log level of the application (such as logger.info or logger.debug).
To set or change logger levels, the Kura logger configuration file may be modified using the vi editor. From the Linux command prompt, enter the following command:
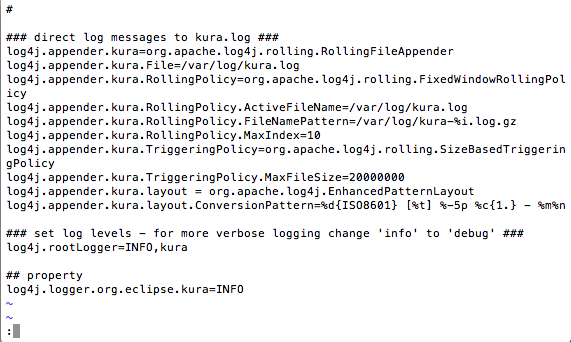
vi /opt/eclipse/kura/kura/log4j.properties
At the bottom of the “log4j.properties” file, there will be one or more “log4j” logger property entries, which determine the logger level used by the bundles at startup.
In the example screen capture shown below, the “log4j.logger.org.eclipse.kura” property has been set to “INFO”, which applies to all bundles that start with “org.eclipse.kura.” Additional, more specific, properties may be defined as required for your particular logging needs. The property entries will take on the defined logger level at startup. The logger levels are hierarchical, so that those in a deeper level of the hierarchy will apply; otherwise, the more general logger level will override them.
Once you have made the necessary changes, save and close the file using the ‘:wq’ command. Restart Kura, and check the log levels in the OSGi console again to make sure that the desired levels have taken effect.
Making Deployment Permanent
The mToolkit deployment of a package is a temporary installation and does not make the package permanent. Once a set of bundles has been tested on the remote target device and is ready for permanent deployment, the software can be installed on a device with deployment packages from the command line of a target device using the instructions below:
- Copy the deployment package file (*.dp) to the target device, into the folder:
/opt/eclipse/kura/kura/packages
- Edit the dpa.properties file through the vi editor by entering the following command:
vi /opt/eclipse/kura/kura/dpa.properties
- Add an entry in the dpa.properties file to include the new package name, such as:
package_name=file\:/opt/eclipse/kura/kura/packages/package_filename.dp
where, “package_name” and “package_filename” should be replaced with the actual name of the deployment package.
-
Save and close the file using the ‘:wq’ command.
-
Then restart Kura, and the new package should be installed in addition to the default Kura package.
In conclusion, this section described how to test a bundle in an Emulation environment within the Eclipse IDE and how to install bundles and Deployment Packages to a remote target system running Kura.